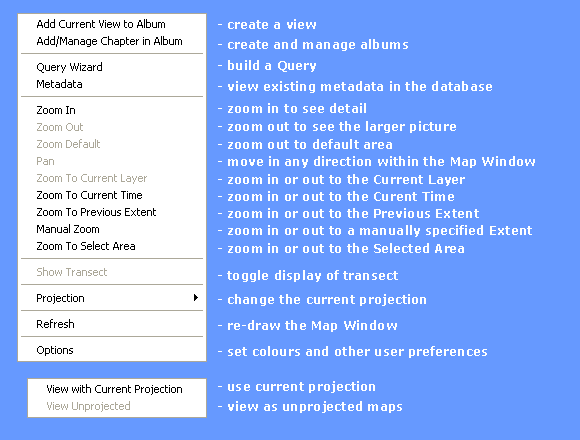
View Menu
The View menu contains the following options:
Add Current View to Album, Add/Manage Chapter in Album, Query Wizard, Metadata, Zoom In, Zoom Out, Zoom Default, Pan, Zoom to Current Layer, Zoom to Current Time, Zoom to Previous Extent, Manual Zoom, Zoom Select Area, Show Transect, Projection, Refresh, Options
STEMgis allows the user to save a number of Views which they or others may wish to return to. These Views may be arranged within Chapters and can also be saved within a STEMgis Workspace file. The information that is saved with a View includes the map extent, the projection, which layers are turned on and information about the current layer including the current time, depth, and attribute.
Note: Other details such as symbol type and colours are not saved so that during a STEMgis session the user may change these parameters while still using the views to move around the map and between layers. Such information is however saved within a STEMgis Workspace file.
To add a View, arrange the layers and map extent as you wish and then select Add Current View to Album from the View menu. The following window will appear.
Give the View a name. This will appear in the Album/View Selector.
To specify Banner Title for a view, add a title to the Banner Title text box. If you have the Banner Title option switched on (see below) this title will appear as an overlay in the map window whenever this view is selected.
If you wish to add the View to a Chapter (collection of Views) then check the Add to Album Chapter check box and select a Chapter from the drop down list. Click OK to finish.
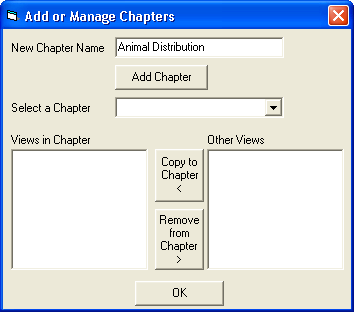
A collection of Views may be saved within a Chapter. For instance, you may have a number of views relating to water quality while having others related to animal distribution (see below). To create or manage a Chapter, select the Add/Manage Chapter in Album from the View menu. Use the following form to manage your Chapters.
Specify a name for the Chapter and click on the Add Chapter button. This will add an item to the Select a Chapter drop down list. To manage a Chapter select one from the drop down list. This will show what Views already exist in the Chapter and also make the remaining views available for adding to the Chapter.
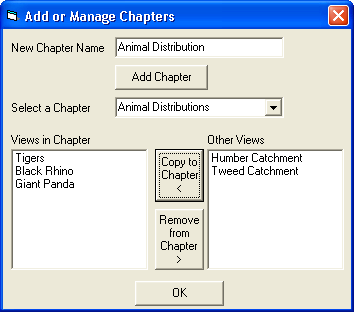
Note: Any one View may belong to more than one Chapter.
To move a View into a Chapter, select the View by left-clicking on the appropriate name in the Other Views section and then click on the Copy to Chapter button. To remove a View from a Chapter, left click on the View in the Views in Chapter section and click on the Remove from Chapter button. Once you are happy with your selections click on the OK button to finish. The following image shows an example of two Chapters within the Album of views.
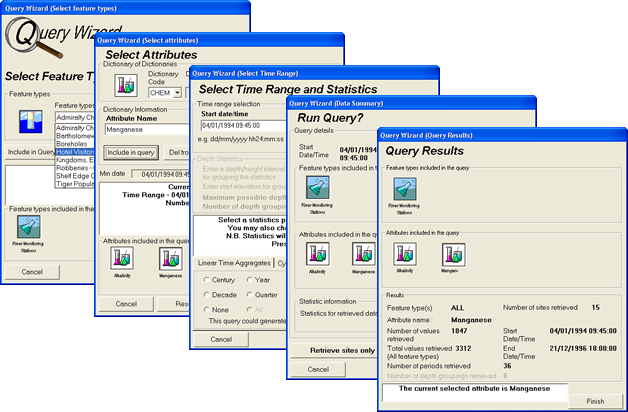
An easy one to five step selection of features and their attributes for display as maps, graphs, reports or animations. The actual steps involved in a particular Query will depend on the Feature selected and whether or not it has attributes, temporal and/or depth components associated with it. Detailed guidance on the use of the Query Wizard is given in a dedicated section of the STEMgis Help facility.
Note: The Query Wizard is also available from the Tool Bar.
Select the Metadata menu item to view all of the metadata titles in the currently opened database.

Select a metadata title to view the entire metadata entry. You can click on the Write to XML Format button to export the metadata entry to an XML formatted file that can be viewed within an Internet browser. Click Close to close the form.
Note: Viewing metadata is also available from the Tool Bar, when the currently active layer has associated metadata and via right-clicking on a spatial feature when that feature has associated metadata.
Allows the user to zoom in to any area of the Map Window using a rubber band box.
Note: Zoom in is also available from the Tool Bar.
Zooms out by a factor of two.
Note: Zoom out is also available from the Tool Bar.
Allows the user to zoom in or out to the default area of the Map Window.
Note: Zoom in is also available from the Tool Bar.
If the user has zoomed in, then Pan will move any point clicked upon in the Map Window to the centre of the Map window.
Note: Pan is also available from the Tool Bar.
Zooms to the currently selected map layer in the Layer Manager.
Note: Zoom to current layer is also available from the Tool Bar.
Zooms to the relevant map extent for the current time in the current layer. A layer may have data for certain sites only during particular dates. This zoom option zooms to a map extent that only includes sites that have valid data.
Zooms to the previous selected map extent.
Note: This option only remembers the last map extent.
This option allows the user to manually specify a map extent. The following dialog appears after selecting the menu item. Use the text boxes to specify the extent using co-ordinates relating to the current map projection.
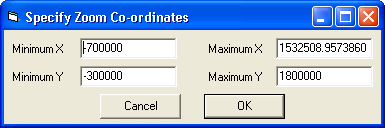
Note: One of the values you specify is likely to be modified as the extent must be mapped to the current size and height/width ratio of the map window.
Zoom to the currently Selected Area within the Map Window
Toggles the display of the last transect line drawn.
Toggles the co-ordinate system used for displaying information in the Map Window between the Projected and Unprojected modes.
The Projection menu contains the following options:
Note: Projection is also available from the Tool Bar.
Redraws the contents of the Map Window.
Selecting the Options menu item allows the user to customize the interface to meet their individual preferences, e.g. to change the default colours used in the Layer Manager.

The options include:
To change any of the colours double-click on the appropriate coloured box and then pick a colour from the colour editor. To select a basic colour click the required colour box, to define other colours select the Define Custom Colours button and either enter numerical values or drag the cursor in the colour palette window.
To toggle any of the ON/OFF options click the appropriate check box.
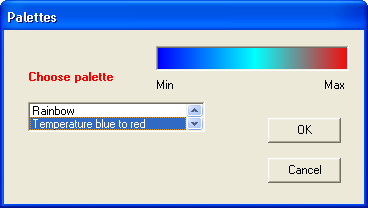
To change a colour palette, double click on the palette and select a new palette from the following form.
Banner Text
When you select to display Banner Text, a title and/or date will appear in map window as an overlay. The text will be displayed in the same relative position within the map window irrespective of the map extent and projection. Banner Text is useful for displaying information to novice users and is commonly used when distributing data to clients using STEMgis Publicist. The Banner Title can relate to a View, so that every time a user selects a new view the Banner Title changes to that specified for a View.
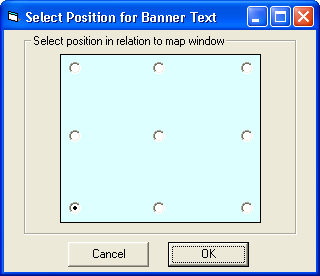
The font, colour and position of the Banner Text can be altered using the controls available on the Options form. To change the colour and font, click on the appropriate buttons and the standard Windows colour and font dialogs will appear. To change the position of the Banner Text, click on the Place button. Use the form shown below to select a position.
Log Value
You cannot have a log of a negative number or of zero. Therefore if you are displaying an attribute that has negative numbers and are using log values to display the range of values, STEMgis must truncate the values to a value just above zero. It is impossible to know exactly what is a good value at this point. For some datasets a value of 0.1 might be reasonable, while other datasets may have their maximum value at 0.1 and all variation in the dataset may occur below this number. The options form may therefore be used to define a value to truncate the negative or zero attributes. By default a log value of -20 is used which equates to an original attribute value of 2.061E-09. This truncation value may be changed by editing the value or log value text boxes.
| Browser Based Help. Published by chm2web software. |